Transform a book into art
November 8, 2022
How to make a book heart
 There are different methods of book folding and this one is called measure and mark. It’s a simple technique that involves using a ruler to mark each page at the points it needs to be folded to create a desired shape and then simply folding at a right angle at each of the marked points.
This heart pattern is provided free by Love Book Folding. The creator, Maria Christensen, has a great tutorial on YouTube that we recommend. For this project, you can start with Video 5 in her series, or follow the instructions below.
Happy crafting!
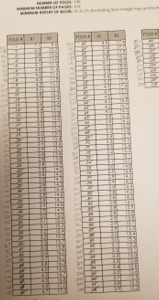
What you’ll need:
- One hardcover book:
- minimum of 216 pages
- minimum height (pages. not cover) of 21.5 cm
- good condition (spine intact, no stains or damage)
- dust jacket removed
- One copy of the basic heart pattern
- a ruler (centimeter/millimetre)
- a pencil with a sharp, fine point (mechanical pencils work well)
Let’s get started!
Step 1. Determine your starting page.
Since your book likely has more pages than the minimum required, you need to determine which page to start folding on so that the shape will be centred in the book. This takes a little bit of math:
a) Go to the back of the book and write down the last numbered page.
b) Count the number of un-numbered pages at both the back and front of the book and write that number down. Remember to count the number of PAGES, not SHEETS (1 sheet=2 pages). Do not count the end papers (the heavier weight pages at the front and back of the book) or any pages that are directly attached to the end papers, as these will not fold properly and are just ignored.
c) Add up the total of numbered + unnumbered.
d) Deduct the minimum number of pages required by the pattern from that total number to get the total number of spare pages.
e) Divide the number of spare pages by 2 to get your starting page.
f) Count the pages from the beginning of the book (excluding the end paper and attached page), remembering to count PAGES not SHEETS, and you will be at your starting point.
*Note that the printed page number will not match your starting page number because you are including un-numbered pages in your count.


Fold at right angles, with the mark you made on the outer edge forming one point of the right triangle. TIP: Use the lines of writing in the book to make sure your fold is straight, at a 90 degree angle.

The top right corner of the page will come down to form the fold based on the TOP mark, and the bottom right corner will come up to form the fold based on the BOTTOM mark.

As you go along, write the page number next to the corresponding fold number to keep yourself on track (do this just a few blocks at a time as you go along, in case you have to tear a page out if you make a mistake). Also make sure to cross off each fold as you complete it to keep yourself on track, as it is easy to get mixed up and look at the wrong measurements.
Just keep folding all the way through the pattern, and you’ll end up with something like this:

TIP: If you make a mistake that can’t be corrected, simply cut or tear the page out carefully. As long as you don’t remove too many, it won’t be noticeable.
You’re all finished!
We’d love to hear what you think and see a picture of your completed craft. If you would like to share your art project with the community on our social media channels, please email photos to: communications@virl.bc.ca or mention us @vilibrary in your Instagram post.
